Vinyl siding installation guide: This comprehensive guide delves into the intricacies of installing vinyl siding, from initial planning and preparation to the final finishing touches. We’ll explore various siding types, installation techniques, and essential safety precautions, equipping you with the knowledge to successfully complete this home improvement project. Discover the benefits of choosing vinyl siding, understand the different profiles available, and learn how to tackle potential challenges with ease.
Whether you’re a seasoned DIY enthusiast or a novice homeowner, this guide provides a step-by-step approach to ensure a professional-looking and long-lasting result. We cover everything from accurate measurements and material selection to the proper techniques for installing around complex features like windows and doors. Learn how to avoid common mistakes and achieve a flawless finish that enhances your home’s curb appeal.
Introduction to Vinyl Siding Installation
Vinyl siding installation is a relatively straightforward process that can significantly enhance a home’s curb appeal and protect it from the elements. This guide will walk you through the key aspects of installing vinyl siding, from understanding the different types available to completing the installation itself. Proper installation ensures a long-lasting, attractive, and weather-resistant exterior.
Vinyl siding offers numerous advantages over other siding materials. It’s highly durable, resistant to rot, insect infestation, and damage from harsh weather conditions. It requires minimal maintenance, typically only needing occasional cleaning. Furthermore, vinyl siding is relatively inexpensive compared to alternatives like wood or brick, making it a cost-effective choice for homeowners. Its lightweight nature also simplifies installation, reducing labor costs and time.
Types of Vinyl Siding
Vinyl siding comes in a variety of styles and profiles to suit different architectural preferences and budgets. The most common types include clapboard, shake, and shingle siding. These profiles differ in their appearance and sometimes their installation methods, impacting both the aesthetic and the overall cost.
Vinyl Siding Profile Comparison
The choice of vinyl siding profile significantly impacts the final look and cost of your project. The following table compares three popular profiles:
| Profile Type | Appearance | Cost (Relative) | Durability |
|---|---|---|---|
| Clapboard | Traditional, overlapping horizontal panels; clean, classic look. Often features a subtle wood-grain texture. | Medium | High; resistant to impact, moisture, and fading. |
| Shake | Imitates the look of natural wood shakes; rough-hewn texture; adds a rustic or craftsman-style appeal. | Medium-High | High; similar durability to clapboard, though slightly more susceptible to damage from high winds. |
| Shingle | Mimics the look of asphalt or cedar shingles; often features a layered appearance; creates a textured, visually interesting surface. | High | High; durable and weather-resistant, similar to clapboard and shake. |
Planning and Preparation
Thorough planning and preparation are crucial for a successful vinyl siding installation. Accurate measurements and efficient material management significantly impact the project’s timeline and overall cost. Overlooking these steps can lead to costly mistakes and delays.
Accurate measurements and calculations are paramount to avoid material waste and ensure a proper fit. Incorrect measurements can result in gaps, overlaps, or insufficient siding, requiring costly rework. This section details the necessary steps for proper preparation, ensuring a smooth and efficient installation process.
Exterior Wall Preparation Checklist
Preparing the exterior walls is a critical step that ensures the longevity and aesthetic appeal of the vinyl siding. A well-prepared surface provides a stable base for the siding and prevents future problems. The following checklist outlines the necessary steps:
- Remove existing siding: Carefully remove any old siding, trim, and flashing. Dispose of materials responsibly according to local regulations.
- Inspect and repair the wall sheathing: Check for any damaged or rotten wood. Repair or replace damaged sections to create a solid, even surface.
- Clean the exterior walls: Thoroughly clean the walls to remove dirt, debris, loose paint, and any other contaminants that might interfere with adhesion.
- Address moisture issues: Inspect for any signs of water damage, such as mold or mildew. Address any moisture problems before installing the siding to prevent future damage.
- Install house wrap: Apply a waterproof house wrap over the wall sheathing to create a moisture barrier. Ensure proper overlap and secure fastening.
- Install flashing: Install flashing around windows, doors, and other openings to prevent water penetration.
- Prime bare wood: Prime any exposed bare wood to prevent rot and improve the adhesion of the vinyl siding.
Material and Tool Management
Efficient material and tool management streamlines the installation process. Proper organization prevents delays and ensures you have the necessary supplies readily available. This includes not only the siding itself, but also all the necessary trim pieces, fasteners, and underlayment.
- Create a detailed materials list: Before starting, create a comprehensive list of all necessary materials, including siding panels, trim, fasteners, and underlayment. Calculate the quantities based on accurate measurements.
- Organize materials: Store materials in a dry, protected area to prevent damage. Organize them by type and size for easy access during installation.
- Gather necessary tools: Assemble all necessary tools before starting the project. This might include measuring tapes, levels, saws, drills, nail guns, and safety equipment.
- Check tool functionality: Ensure all tools are in good working order to avoid delays and ensure accurate work.
Potential Challenges and Solutions
Planning for potential challenges during the installation process is essential for a successful project. Identifying these challenges in advance allows for proactive solutions, minimizing delays and unexpected costs.
- Uneven walls: Uneven walls can create difficulties in installing siding. Solutions include using shims to level the siding or using furring strips to create a more even surface.
- Unexpected obstacles: Unexpected obstacles such as electrical wiring or plumbing pipes may be encountered. Proper planning and consultation with relevant professionals can help to mitigate these issues.
- Weather conditions: Extreme weather conditions can significantly impact the installation process. Scheduling the installation during favorable weather conditions is crucial.
- Material shortages: Material shortages can lead to delays. Ordering materials in advance and having a contingency plan in place can help avoid this issue.
Installation Process
Installing vinyl siding is a straightforward process when approached systematically. Proper installation ensures a long-lasting, attractive exterior for your home. This section details each step, from installing the foundational elements to finishing touches. Careful attention to detail at each stage will contribute to a professional-looking result.
Installing Starter Strips and J-Channels
Starter strips form the base for the first row of siding, providing a level starting point and ensuring proper alignment. J-channels are installed at corners and around windows and doors, creating a neat and finished edge for the siding panels to fit into. They guide the panels and prevent unsightly gaps. Starter strips are typically nailed directly to the sheathing, while J-channels are often secured with nails or screws, ensuring a secure and watertight seal. The starter strip should be level and plumb, acting as a guide for subsequent rows. J-channels are positioned to allow for proper panel insertion and overlap.
Installing Vinyl Siding Panels
Vinyl siding panels are installed horizontally, overlapping each panel below. The bottom edge of each panel should slide into the channel of the panel below. This overlapping creates a weatherproof barrier. Each panel is fastened using special nails designed for vinyl siding, avoiding over-driving the nails to prevent damage to the panels. Proper fastening is crucial for both aesthetics and weather resistance. Nails should be driven into the nailing slots on the panel to allow for expansion and contraction due to temperature changes.
Cutting and Fitting Panels Around Windows and Doors
Precise measurements and careful cutting are essential for a clean finish around windows and doors. Use a sharp utility knife or a siding cutter to create clean cuts. Measure twice and cut once to avoid wasting materials and ensure a proper fit. Remember to account for the expansion and contraction of the vinyl siding material when cutting. The cut panels should fit snugly into the J-channels installed around the openings.
Installing Corner Trim and Other Finishing Pieces
Corner trim pieces cover the outside corners of the house, creating a finished look and providing extra protection against the elements. These are typically installed before the siding panels in the corner areas. Other finishing pieces, such as drip edges, soffit vents, and fascia, are also installed to complete the exterior. These pieces enhance the aesthetic appeal and provide additional protection to the structure. Proper installation of these finishing pieces is critical for achieving a professional and durable installation.
Step-by-Step Installation Summary
- Prepare the wall surface: Ensure the surface is clean, dry, and free of any debris.
- Install starter strips along the bottom of the wall.
- Install J-channels around windows, doors, and corners.
- Install the first row of vinyl siding panels, ensuring proper overlap and fastening.
- Continue installing subsequent rows of siding panels, maintaining consistent overlap and fastening.
- Cut and install panels around windows and doors, ensuring a snug fit.
- Install corner trim and other finishing pieces, ensuring proper alignment and fastening.
- Inspect the completed installation for any gaps or inconsistencies.
Working with Specific Features
Installing vinyl siding around complex architectural features requires careful planning and precise execution. Successfully navigating these challenges ensures a professional-looking and watertight finish. This section details techniques for handling various complexities often encountered during vinyl siding installation.
Vinyl Siding Installation Around Bay Windows and Dormers
Bay windows and dormers present unique challenges due to their multiple angles and projections. Accurate measurements are crucial. Start by carefully measuring each section of the bay window or dormer, accounting for all angles and overlaps. Pre-cut pieces to fit snugly, ensuring proper alignment and avoiding gaps. Use J-channel and other trim pieces to create a neat and weatherproof transition between the siding and the window frame. Remember to maintain consistent overlap to ensure proper water shedding. For dormers, consider using starter strips to establish a consistent vertical line before installing the remaining siding. Precise cuts and careful fitting are key to a seamless appearance.
Installing Siding on Uneven Surfaces
Uneven walls present a significant hurdle in vinyl siding installation. Before installation, assess the extent of the unevenness. Minor imperfections can often be addressed by using shims to create a consistent plane for the siding. For more significant unevenness, consider using furring strips to create a level surface for the siding to attach to. This creates a consistent substrate and prevents the siding from buckling or warping. Remember to always check for levelness throughout the installation process and adjust as needed. This meticulous approach will yield a more professional and durable final product.
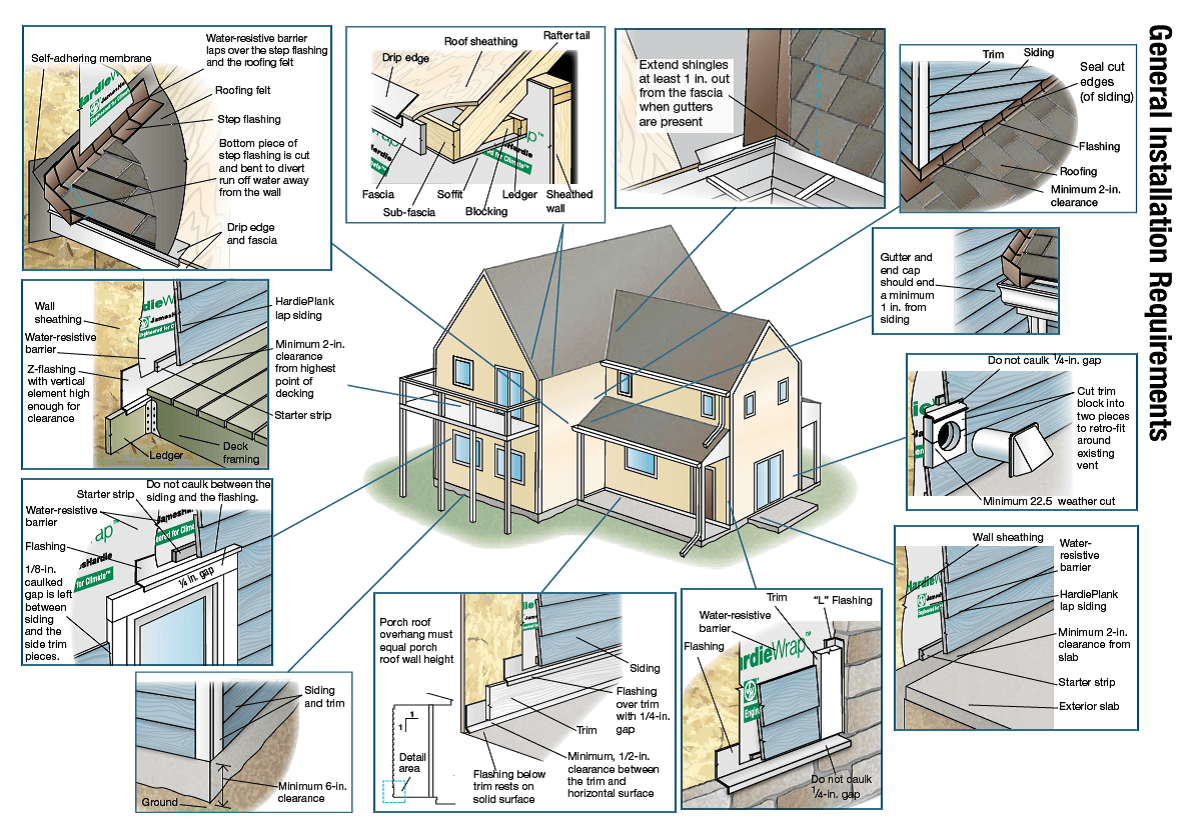
Flashing Around Windows and Doors
Proper flashing is critical for preventing water intrusion. Before installing siding, install flashing around all windows and doors. This involves using a waterproof membrane that overlaps the window or door frame and extends up under the siding. This creates a barrier that redirects water away from the vulnerable areas. The flashing should be securely fastened and sealed with appropriate sealant to prevent leaks. Overlapping layers are crucial to create a complete barrier. The type of flashing will depend on the specific situation, but the core principle remains consistent: prevent water from reaching the underlying structure.
Cutting and Fitting Vinyl Siding Around Pipes and Vents
Pipes and vents require careful planning and precise cuts. Use a sharp utility knife or a specialized vinyl siding cutter to create clean, accurate cuts. Avoid using excessive force, which can damage the siding. For pipes, use a hole saw or carefully cut a hole around the pipe. Then, use a suitable trim piece, such as a pipe flange, to create a neat and watertight seal around the pipe. For vents, measure carefully and cut the siding to fit snugly around the vent. Ensure that the vent is properly sealed to prevent drafts and water intrusion. Properly fitting and sealing these penetrations is crucial for maintaining the integrity of the siding system.
Finishing Touches and Maintenance
With your vinyl siding installation nearing completion, the final steps are crucial for ensuring a long-lasting, attractive exterior. Careful inspection, proper sealing, and a commitment to regular maintenance will protect your investment and maintain the beauty of your home’s siding. This section details the essential finishing touches and ongoing maintenance required for optimal performance.
Thorough inspection of the completed installation is paramount. Start by visually examining the entire surface from a distance to identify any obvious discrepancies, such as misaligned panels, gaps, or damaged sections. Then, move closer, inspecting each panel for proper overlap, secure fastening, and straightness. Pay close attention to corners, edges, and around windows and doors, as these areas are often prone to issues. Check for any loose nails or screws, and ensure all flashing is correctly installed and sealed. Addressing any defects promptly will prevent further damage and maintain the integrity of the siding system.
Caulking and Sealing
Caulking and sealing are vital for preventing water penetration and air leakage. Use a high-quality, paintable exterior-grade caulk designed for use with vinyl siding. Apply caulk to all gaps and seams, including around windows, doors, corners, and where the siding meets other building materials. Ensure a smooth, even bead of caulk, avoiding gaps or excess material. Allow the caulk to fully cure before painting, following the manufacturer’s instructions. Proper caulking protects against moisture damage and contributes to energy efficiency.
Vinyl Siding Cleaning and Maintenance
Regular cleaning and maintenance are essential for preserving the appearance and lifespan of your vinyl siding. At least once or twice a year, wash the siding with a garden hose and a soft-bristled brush. For tougher stains, use a mild detergent solution. Avoid harsh chemicals or abrasive cleaners, as these can damage the vinyl surface. Regular cleaning removes dirt, mildew, and other debris, maintaining the siding’s vibrant color and preventing premature deterioration. Inspect the siding regularly for any signs of damage, such as cracks, holes, or loose panels, and address these promptly to prevent further issues.
Common Vinyl Siding Problems and Solutions
| Problem | Cause | Solution | Prevention |
|---|---|---|---|
| Cracked or Broken Panels | Impact damage, improper installation, or exposure to extreme temperatures. | Replace the damaged panel(s). | Proper installation, use of protective coverings during construction, and regular inspection. |
| Loose or Sagging Panels | Improper fastening, expansion and contraction due to temperature changes, or damage to underlying structure. | Re-fasten loose panels or replace damaged ones. Ensure proper nailing techniques are used. | Proper installation, using the correct type and number of fasteners. |
| Mildew or Mold Growth | Moisture buildup, lack of cleaning, or shaded areas with poor ventilation. | Clean with a mild detergent solution and a soft brush. Consider using a mildewcide for persistent growth. | Regular cleaning, ensuring proper ventilation, and trimming overhanging branches. |
| Discoloration or Fading | Exposure to sunlight, pollutants, or lack of cleaning. | Regular cleaning can help maintain color. Severe fading may require replacement. | Regular cleaning and consideration of siding color choices that are more resistant to fading. |
Safety Precautions
Safe practices are paramount during vinyl siding installation. Failing to prioritize safety can lead to serious injuries or even fatalities. This section details crucial safety measures to ensure a safe and successful project.
Proper safety equipment significantly reduces the risk of accidents. Eye protection, gloves, and sturdy footwear are essential for every stage of the installation.
Personal Protective Equipment
Safety glasses or goggles should always be worn to protect your eyes from flying debris, such as sharp pieces of siding or nails. Gloves protect your hands from cuts, splinters, and chemical irritants that may be present in some siding materials or cleaning solutions. Steel-toed boots provide protection for your feet from dropped objects or accidental impacts. A dust mask is also recommended to prevent inhalation of sawdust or other airborne particles.
Working at Heights
Working at heights presents significant risks, including falls. Always use appropriate fall protection equipment, such as safety harnesses and anchored lifelines, when working on ladders or scaffolding above six feet. Ensure ladders are placed on stable, level ground, and are extended at least three feet above the landing point. Inspect all scaffolding and ladders before use to ensure they are in good condition and free from damage. Never overreach while working at heights. If necessary, move the ladder or scaffolding to maintain a stable and safe working position.
Safe Material Handling and Disposal
Vinyl siding, while relatively lightweight, can still cause injury if handled improperly. Lift heavy bundles using proper lifting techniques to avoid strain or injury. Avoid dropping or throwing siding pieces, which could cause damage or injury. Dispose of waste materials, such as scraps of siding and packaging, responsibly according to local regulations. Sharp objects, such as broken pieces of siding or used nails, should be disposed of in puncture-resistant containers to prevent injuries. Leftover materials should be stored in a dry, secure location to prevent damage or theft.
Illustrative Examples
Visualizing proper vinyl siding installation is crucial for achieving a professional and long-lasting finish. The following examples detail the correct installation around common exterior features, providing specifications for materials and dimensions.
Vinyl Siding Installation Around a Window
Correctly installing vinyl siding around a window involves using J-channel and trim to create a neat, weatherproof seal. Imagine a double-hung window measuring 36 inches wide by 48 inches tall. The window is framed by a standard 4-inch wide window trim. We’ll use 6-inch wide vinyl siding panels with a 1/2-inch overlap. First, the J-channel is installed around the window frame, ensuring a tight fit against the trim. The J-channel provides a channel for the siding to slide into, creating a clean, finished edge. The siding panels are then cut to length and carefully installed, overlapping each panel by 1/2 inch. The top and bottom pieces of siding butt neatly against the J-channel, creating a seamless transition. Finally, additional trim pieces, possibly a 4-inch wide piece matching the window trim, might be added for a more finished aesthetic. The entire assembly is secured using appropriate nails or screws, ensuring the siding is securely fastened but without causing damage to the material. The chosen vinyl siding is a standard, 0.046-inch thick material in a classic white finish, meeting industry standards for durability and weather resistance.
Vinyl Siding Installation Around a Corner
Installing vinyl siding around an exterior corner requires the use of corner trim to create a strong, weathertight joint. Consider a corner where two walls meet at a 90-degree angle. We’ll use the same 6-inch wide vinyl siding panels and 1/2-inch overlap as the window example. Corner trim, specifically designed for vinyl siding, is installed first, ensuring a straight, plumb line at the corner. The corner trim provides a channel for the siding panels to slide into from both sides. The siding panels are then cut to length and installed, overlapping by 1/2 inch. The overlapping panels on each side of the corner should neatly meet at the center of the corner trim, creating a clean and even finish. Each siding piece should slide into the channel of the corner trim, ensuring a tight, weatherproof seal. The entire assembly is secured using nails or screws, ensuring a strong and secure installation. The corner trim is the same material and color as the siding, maintaining a uniform look. The material specifications remain the same: standard 0.046-inch thick vinyl siding in a classic white finish. The corner trim is also 0.046 inches thick and designed to match the siding profile for a seamless appearance.
Final Conclusion
Successfully installing vinyl siding transforms your home’s exterior, enhancing its aesthetic appeal and protecting it from the elements. This guide has provided a detailed roadmap, covering everything from planning and preparation to the final inspection and maintenance. By following these steps and prioritizing safety, you can confidently undertake this project and enjoy the long-term benefits of a beautifully finished and durable exterior. Remember, proper planning and attention to detail are key to achieving a professional result that will enhance your home’s value and curb appeal for years to come.